Friday, December 17, 2021

Member Spotlight Show

   Two of my texture paintings are included in the Annual Member Spotlight Art Show at The Phipps Center for the Arts. The show is virtual this year, and here is the video.


Non Traditional Tools for the Art Room

  This year marks my seventeenth year of teaching elementary art. It is odd to think I've been in the classroom for that long, but I've picked up a few things along the way and this post shares some of the more unusual items that I use on a regular basis in my art room, and explains what I do with those items. Click the image to be directed to an Amazon Affiliate link to the product!

  I use these crab crackers All. The. Time. They will open regular glue bottles, gallon glue bottles, paint containers, glaze jars-anything with ease. I've also seen people use hand held nut crackers, but these are great because the smaller space closer to the hinge is the perfect size for the orange tip of an Elmer's glue bottle for those situations that call for the tip to be removed and cleaned out while the larger space is perfect for larger lids. THIS is my best tip for new art teachers. Don't hurt your hand or waste time soaking the bottle-use one of these!

  Sometimes there is just a little bit more of a product left and I don't want to waste it, but also don't have time to stand around holding the bottles together to combine the product. This Smart Funnel will hold the bottles for me so I can get on to other tasks. 


   Several years ago I was struggling to figure out how to display some clay plaque style Tiki mask projects when I received a donation to my department. I used the newfound money to purchase a bunch of these foldable phone stands. I put a line of hot glue at the front of each of the display case shelves to make sure the stands don't slide, and it became a perfect solution. They fold flat so I am able to easily store them when not in use. 


    These industrial bakers racks have completely changed storage of 3D artwork for me. I used a strip of magnet along one side and these magnetic labels to add the class code to each shelf (magnets do not stick to the rack alone).

 I purchased a twelve pack of full size sheet pans to use in the bakers racks for lighter projects, such as paper sculptures. 

 I also got a few of these half sheet pans with cooling racks. These are awesome for clay! The cooling rack allows for even drying which prevents cracking, and the half size is more manageable for heavier projects such as clay.


   These are the BEST staple removers. They side under the staple and collect them in the gap at the bottom of the photo. They are magnetic to help avoid dropping the staples, and so easy to use that my students help me take down bulletin boards with them.


   When I finish taking down a bulletin board I use this telescopic magnet to double check that I'm not leaving any sharp staples on the floor.


   I have a cart like this one for my art displays. On the bottom shelf I have a bin of the phone holders that are listed above for clay plaque projects and a bin of these magnetic hooks for hanging art from the crossbeams of the ceiling. The middle shelf has staplers, staples, thumb tacks, tape, etc. Anything I anticipate needing as I am putting up artwork. One of the bins that hang from the side I use for the staple remover and telescoping magnet listed above, scissors, pen, pencil, and Sharpie. The second one I use to collect used staples. Under the wooden lid I keep an X-acto knife set and any display signs that I think I will want to use again in the future. The lid is nice to put a stack of artwork on so I don't have to bend down to pick up each new work. Sometimes I use a paper sorter like this to hold a larger stack of artwork. 


   These FIFO (First In, First Out) bottles are amazing for paint distribution. I use a cart similar to the one above and have these bottles in bins on the top shelf with rainbow colors, black, brown, and white. The next shelf has paper plates and/or magazines for palettes, and the bottom shelf has muffin tins that I use with portion cups for more expensive liquids such as glaze or metallic paint (TIP: if you only need six spots, the Dollar Tree has small muffin tins!). I also have a paper towel holder on it with nice, absorbent paper towels just in case.


   Kitchen scrapers like the one pictured are very helpful in the art room. I used mine during summer school to get a large sticker off the just-been-waxed floor. They also work on paint, hot glue, and more.

Books for the Elementary Art Room

Like many-dare I say most?-elementary art teachers, I use a lot of children's books in my art classroom. Recently, there have been many posts in different art teacher Facebook groups asking about favorite books for the classroom, prompting me to create a list of books, organized by categories; artists, inspiring, cultural, elements, principles, character traits/SEO, diversity/inclusion, non-fiction, activity/coloring books, and teaching resources. Each row includes a photo of the book cover, title, author, and an Amazon affiliate link. I also have space for the subject/art connection, country/culture and project ideas. I will be adding to this list as I discover new books, and link projects as I create them for the subject and/or artist in the book(s).

While you're here, though,  here are a few of my recently discovered children's books.


A Life Made by Hand: The Story of Ruth Asawa by Andrea D'Aquino

I discovered the amazingness of Ruth Asawa last spring, and was thrilled to find a children's book about her life that is approved by her family. I am working on developing a lesson with Asawa's sculptural style. 


Art From Her Heart: Folk Artist Clementine Hunter by Kathy Whitehead and Shane W. Evans


Banksy Graffitied Walls and Wasn't Sorry by Fausto Gilberti

This book is actually one of a series of books including Jackson Pollock, Yves Klein, and Yayoi Kusama.


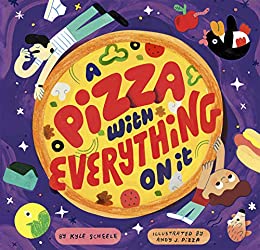
Pizza with Everything on It by Kyle Scheele

Last years my fourth graders made paper mache food and this book would be the perfect compliment to the project. It would open the kids up to thinking about odd things they can add to their artwork and also open up discussion about textures.

Saturday, March 7, 2020

Value Mixing Projects

   Fourth grade is working on understanding how to mix value with paint. They've learned about hue, tint, tone, and shade and have chosen a project to demonstrate their learning with. Luckily, our fourth graders have Chromebooks, so we use Google Classroom and I put all of the resources linked in this post on their GC for them to teach themselves how to create the projects while I circulated and talked with them to gauge understanding and assist where needed. They had three projects prepared for them, and a slide of other ideas in case they didn't like any of the prepared projects or wanted to challenge themselves more.


   I began with this presentation about value, hue, tint, tone, and shade and how to mix each value. Then students logged into their Chromebook to begin the project of their choice. The first project we talked about is based on artist, James Rizzi and his cityscapes. They had access to this presentation of examples of Rizzi's cityscapes and this video of me creating my example project, which is hanging on the whiteboard in the art studio. They were told that each building should be monochromatic and use the hue, tints, tones, and shades of the color chosen for the building.


   The next project, shown above with the image that inspired me and my example from the video, is value chevrons. They have access to this video to show them how to create the chevrons and mix values to paint them.


   The final project that was prepared for them is the value pyramids shown above. The first image is what inspired me and the second is the example I created in this video for the students. 


   I have started this project with two of my four fourth grade classes because we didn't have specials on Friday for me to see the other two. So far I am happy with the students' progress overall and am looking forward to seeing how these projects turn out. 

Spring Animals

     My new technique has been going pretty well so far. I am getting some push back from a few students in each grade, but keep reminding them that TAB wasn't working for us for several reasons; behavior, waste, and cleanliness being the biggest. I recently began a lesson with second grade that is going pretty well so far. I found an image online of a cute little bunny in a patch of flowers and followed the links to Mrs. Filmore's blog. The link there is a different post about the same project, but the post I saw only had a bunny or a bear as options. I loved the project, but not the fact that these students used a printed version of the animal and just added texture lines, cut it out and glued it down. So I used the idea but modified it for my classroom.


   I made three videos-one for the background, one for the bunny, and one for the bear. I then told my students that they could modify one of those animals to create a different animal if they'd like. I used the examples of modifying the bunny into a squirrel by changing the shape and size of the ears or making the bear into a cat by changing the shape of the nose and ears and adding whiskers. Well, the kids got a bit carried away in my first class and started wanting to make things like lizards and spiders so I had to change how I was saying it to be "any furry animal that might live or hide in a garden." It still backfired a little, and I do have a bee and a bird being worked on as I couldn't talk them out of it. If I do this again, I guess I'll have to say any furry mammal that may live or hide in a garden!

   First the students were shown the beginning of this presentation and the background video so that they all knew how to do the background.


   Then I told the students that when I say the magic word (it was pineapple) they would split into two groups. If they wanted to create or modify the bunny they'd sit by the SmartBoard and if they wanted to create or modify the bear they'd sit at one of the other two tables. On the way to the bunny table they were to pick up a piece of 9X12 white construction paper, a pencil, and an eraser. On the way to the other tables they were to pick up a piece of 9X12 watercolor paper and a marker block. The kids who wanted to do the bear would start the bear the next class and work on the garden the first class while the bunny group worked with me and the video to draw their bunnies with pencil.


   We had just enough time to get that done in our 35 minute class period. Then next class, regardless of where they left off students switched groups. If they were working on their garden last class they met by the SmartBoard to make their bear and if they were drawing their bunny they started their garden. 


  Again, just BEARly enough time to get that done in 35 minutes. Next class all the students will be shown the Sharpie step and start working on that. They will also have the option of finishing their garden. The fourth class period they will cut out their animal and glue it to the background and mount the artwork on a colored border paper. They will then use iPads to upload their finished spring animal to our Artsonia gallery. 


Sunday, February 23, 2020

The New Plan

I have decided that full TAB is not my style. Although I have loved the deeper conversations the kids are having about their artistic decisions, the messy classroom and disrespectful behavior I was constantly battling has to go. So I have begun a project based class again, but with the intent to keep each project very open to allow for choice within the confines of the project. For example, second grade is making landscapes using warm and/or cool colors. I showed them an example using collage, drawing, and painting and they are required to show foreground, middle ground, and background.

For the third through fifth grade students, I have the luxury of being able to ask them to bring their Chromebooks and can use Google Classroom to push out content. Fifth grade's focus is contrast, emphasis, and value right now, so I created two different project options and pushed out a Google Slides presentation with step by step photos and a video for how to make each of the projects. Students are independently using the materials to teach themselves how to create one of the projects with me there to clear up any confusion or help when needed.  All four of my fifth grades have used this and although the first class had some technical difficulties, I can confidently say it worked better for all four than full DBAE or full TAB. I remembered to ask two of the classes to show me fist to five (fist being "I hated it" and five being "loved it, let's do it every time!") how they felt about being self guided and saw mostly fives, with a few fours thrown it. I am currently working on materials for three different fourth grade projects using value and mixing tints, tones, and shades as the main concepts.

Here are the projects and resources for the fifth grade projects. We looked at Op Art, and I gave this full class presentation about the movement. At the end of the presentation, I talk about the new structure of the class and how they will access the presentations and videos through their Google Classroom link. If the teacher uploads the resources as "materials" they will be listed under "classwork" and you can create a unit title and even decide what order they are listed in under the title. This worked very well. I gave the two projects a title too and made sure the students knew which project matched each title. Here are the projects fifth grade had to choose from:

LINE DESIGN:
I got this lesson from Art with Mr. E, and he created a great step by step, which is where I got the photos from for the presentation.


Here is the presentation for this project, and here is the video I created for this project. 

CONES & SPHERES: 
I don't know where I originally got this lesson, as it's one I have done off and on for over ten years. It's a classic, but the kids love it. 


Here is the presentation for this project, and here is the video I created for this project. 

Friday, January 31, 2020

Five Months of TAB

  Here we are, with five months of TAB under my belt. There are things that are going very well, some things that need to be tweaked, and some things that are a bit disastrous. As expected with a completely new teaching philosophy. Where to start; the good, the bad, or the ugly?

How about the good. My students are DEEP. Some of the things they write for their artist statements blow me away.  Take these examples:

Here is a splatter painting by a fourth grader.
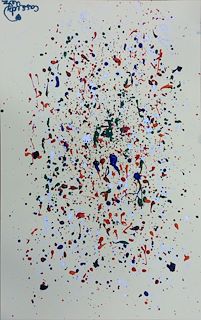
I think that all people on earth of all different shapes, sizes and colors should come together in peace. Like how the dots of all different shapes, sizes and colors come together as one art peace.
Or this self portrait, also by a fourth grader.
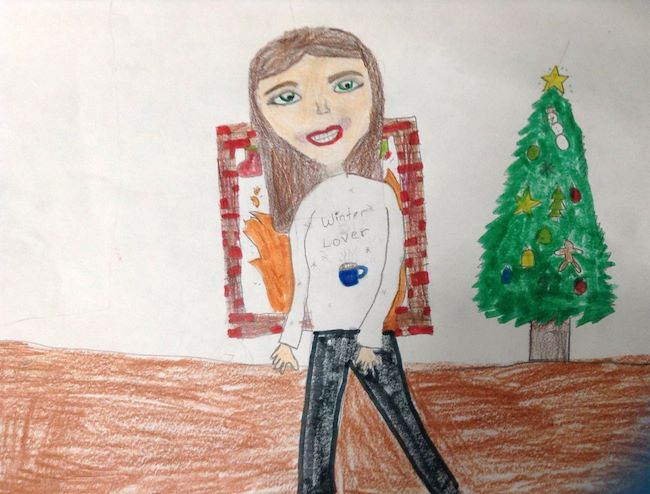
This picture Is my wow work,self portrait,and foreground middle ground and Background I made this drawing because I love Christmas and winter.

Or this collaborative project by two fourth graders (my fourth graders are pretty awesome this year).

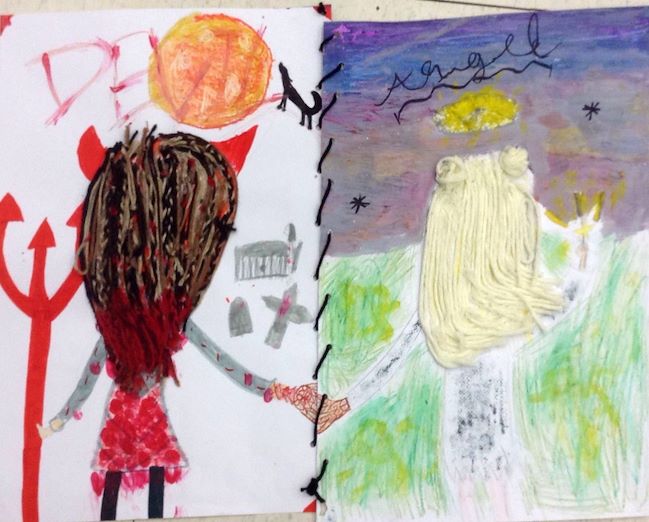
My friend Maeve and I wanted to do something for Halloween, but it ended up being almost thanksgiving! We added lots more ideas as we worked such as, the background foreground and middle ground, and the hills and halo for the Angel, the moon, graveyard, pitchfork, and the wolf. It's also about two people who have different life styles but still are friends.
How about one from a fifth grader.
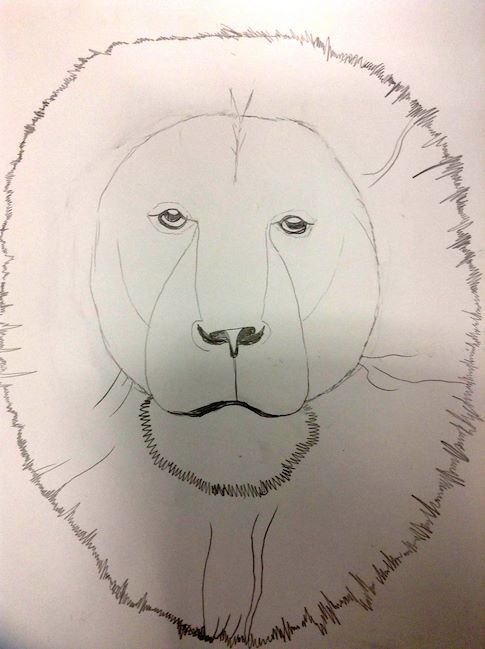
My wow work is definitely considered a wow work because I didn't copy anything;sure I looked at a picture but that was to get an idea. I didn't use the picture to draw it. My work has texture in the main,and was left uncolored because I didn't want to ruin my lion.

Now, I'll admit these are some of the best artist statements. We are working in deepening these statements in the coming months. 

We are tweaking clean up. There are way too many students who seem to think it's okay to ignore me when I tell them it is clean up time. The younger the students, the worse this problem is. I am hoping to come up with a solid plan of action for this soon. Actually, this might belong in the things that are not going well part of this reflection. . . 

I think the biggest challenge for some of my students is coming up with their own ideas. A few weeks ago we discussed starting a creative "bank account" of ideas and students in second through fifth grades opened their own creative bank account and put in as many inspirational things as they could in their class time. 


Friday, May 17, 2019

Clay Shelves and Stools

They're here! I am so glad that I purchased these racks for clay! They are very versatile and are working really well for all things sculpture. I hot glued magnets to the right side, every other shelf and made laminated arrows with magnets on the back (the rack isn't magnetic-who knew?!). I use a Vis-a-Vis marker to write the class code that is on the shelf to keep track of where projects are. 


The stools are working well so far too. A few kids are choosing to stand while working and the room feels significantly larger without the bulky chairs. I am concerned with how long they will last, but at $42 for a set of five I'm happy with them for now. I have already had to bend two legs back into place due to students leaning on one or two legs. 


Wednesday, May 8, 2019

A Victory

I posted about my first snag a few weeks ago, but this week I had my first big victory. At my primary school I want to have five permanent stations; drawing, painting, collage, fibers, and art preparation. I don't have enough shelving to create these stations, though so I went into planning mode. I am very fortunate that our district employs an extremely talented carpenter, who builds things for us at just the cost of supplies. I also have a healthy Artsonia  program and have been saving for over a year for something big. I sent the plans for the shelves I designed to the carpenter and he said with principal approval he can build them for about $300. I have plenty of money in my Artsonia account, so my principal approved it within minutes of my emailed request. I'm super excited about this! In addition to the custom shelves, I also managed to order two commercial racks and sheet pans for drying clay and replaced all my old, breaking chairs with stools so the kids have more flexibility with sitting or standing while working. Below are photos of the racks I'm talking about and the stools. I am a little concerned about the stools' durability but at $42 for five I can afford to replace a few here and there when they break and I have 30 right now but my biggest classes are 25 kids.